![]()
![]()
To access a video, right-click on the hyperlink and select Open in new window.
Creating a Billing Summary Video - This video shows how to generate a billing summary for both a single client and in a batch.
How do I create a batch template?
To generate multiple billing summaries at once, even for your entire practice, you can set up a batch report. A batch report requires you to set up a template that includes the reports that will be included in the batch, and then a schedule for when the reports will be generated, and for whom.
To create a batch template, do the following:
Go to the Reports tab, then select the Batch Templates page.
On the toolbar, click New Template. The Template Setup window opens.
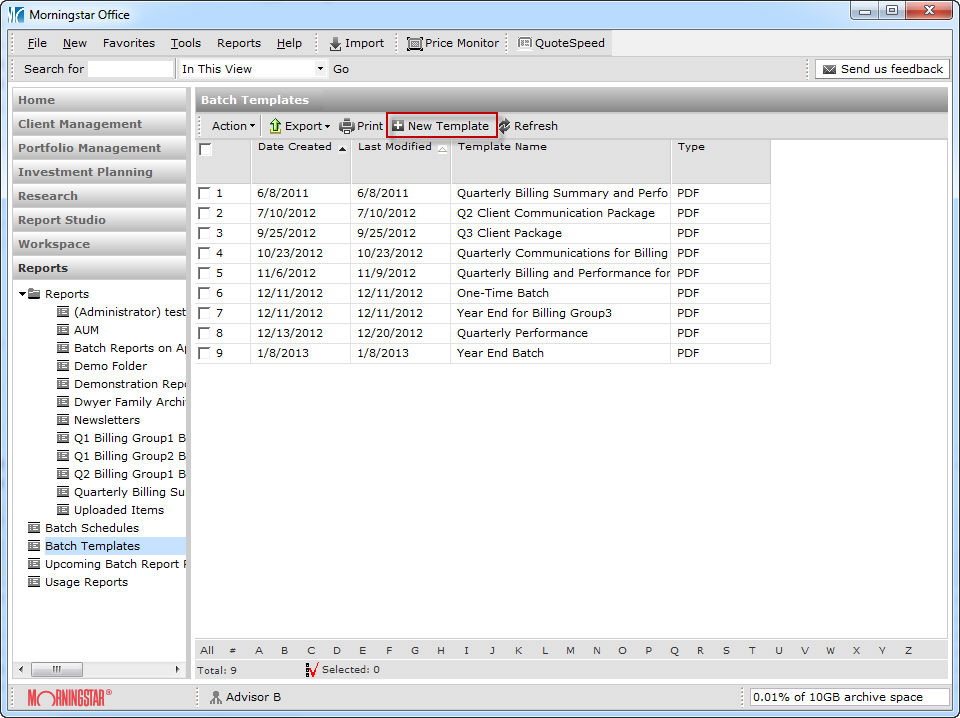
In the Template Name field, enter a name for the template.
In the Standard Reports area, double-click Billing Summary to include it in the batch.
Note: You can also double-click the names of other reports you want to include in the batch.To change the order of the reports, click the name of a report in the right box and use the up and down arrows to change its position. To remove a report from the batch, click the name of a report, then click the left arrow. Once a report is included in the box to the right, you can double click on the report to customize it.
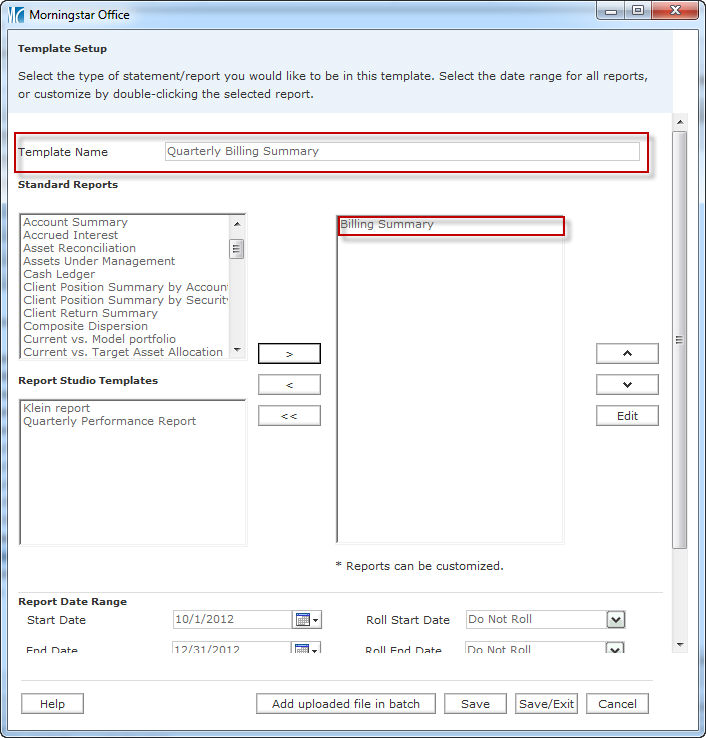
In the Report Date Range area, select a Start Date and End Date for the report(s).
Note: In the Reports with “as of” field, enter a date if you’ve included reports in the template that run on one particular day (e.g., Portfolio Snapshot, Portfolio X-Ray).
If you want the report template to roll with the calendar, select Use Schedule Frequency from the Roll Start Date, Roll End Date and Roll As Of Date. For example, if reports are run quarterly, the report dates will automatically change (e.g., to 4/1/2010—6/30/2010 for reports with start and end dates, and to 6/30/2010 for reports with an as-of date). If you are running this batch just once and do not need this feature, select Do Not Roll from these fields. If your Billing Summary report uses different dates from your other reports, you can double-click on the Billing Summary and customize the dates in the dialog box.
There are other ways to manipulate the Roll dates. For example, if you would like the report dates to always be Year To Date, you can set the Start Date as 01/01/YYYY, and leave the Roll Start Date field as Do Not Roll. Be sure to change the Roll End Date field to Use Schedule Frequency.
Click Save/Exit.
How do I create a batch schedule?
Once the batch template is complete, you must set a batch schedule. The batch schedule determines what day the reports should be produced on, and for which clients.
Note: A distinction exists between the dates you selected for the batch template, and the date for the schedule. The dates for the template cover the content of the report. The date for the schedule covers when the batch is produced. For example, a template might cover data for an account from 1/1-3/31, but the schedule could call for this report to be produced on 4/5.
To create a batch schedule, do the following:
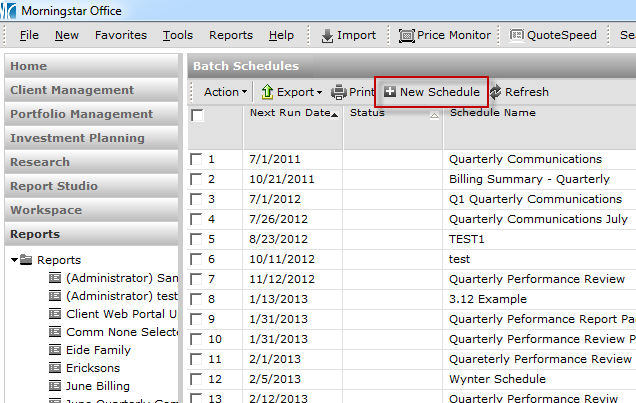
From the Reports tab, select the Batch Schedules page.
On the toolbar, click the New Schedule icon. The Report Generation Schedule window opens.
How do I use the Schedule tab on the Report Generation Schedule window?
When using the Report Generation Schedule window, the first tab you encounter is the Schedule tab. Here, you need to select the following factors:
which batch template to generate
the frequency with which the batch should run
when the batch should run
whether to use a cover page and table of contents
what title to put on the cover page, and more.
To use the Schedule tab, do the following:

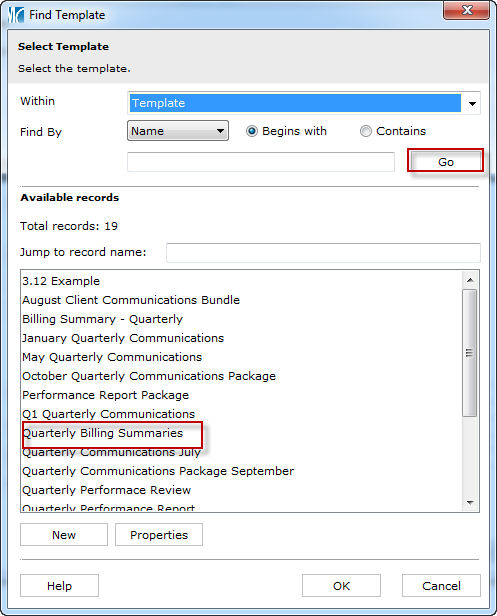
Click Go. The Available Records list is populated.
Click the name of the template you want to run and click OK. You are returned to the Report Generation Schedule window.
Click the Frequency drop-down and select Daily, Weekly, Monthly, Quarterly, Semi-annually, or Annually. This will determine how often the batch reports are generated.
In the Start Date field, click the calendar icon and select the date on which you would like to generate the reports. Your reports will be generated the night of this date and be ready to print, email, or post to the Client Web Portal the next morning. For quarterly reports, you should select the fifth business day of the following month. For example, for Q1 reports, you should select 4/5. This will allow enough time for all transactions to close at your custodian, and be imported and reconciled in Office.
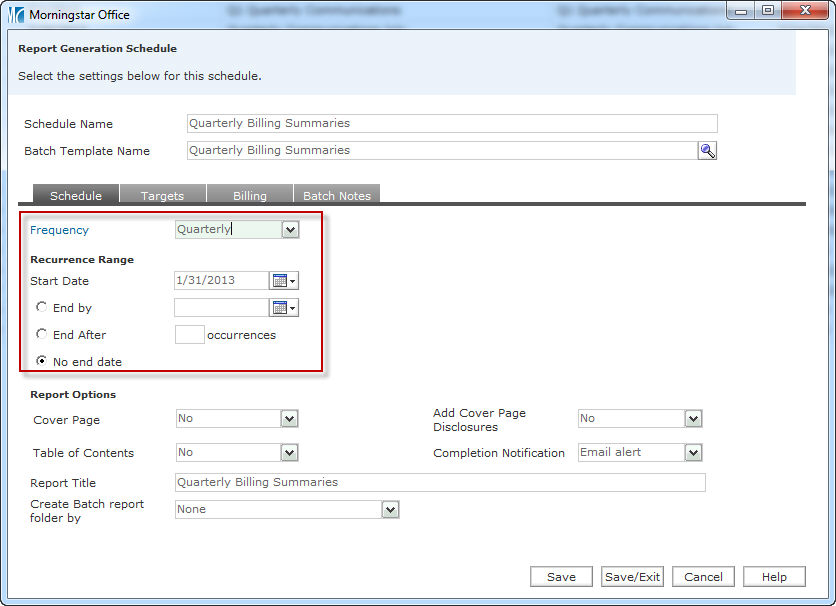
For end dates, you have three options:
- Click the End by option button and click the calendar icon and select an end date when these batch reports will stop running,
- Click the End After option button and enter a number of occurrences after which reports will no longer generate, or
- Click the No end date option button if you want the reports to continue generating at the frequency you establish.
To include a cover page, click the Cover Page drop-down and select either Yes-Portrait or Yes-Landscape.
To include disclosures, click the Add Cover Page Disclosures drop-down and select Yes.
These are report disclosures, not billing disclosures. In order to include report disclosures, you must first create the disclosures, assign them to a report setting, and assign that report setting to your clients.
You can include a Table of Contents by clicking that drop-down field and selecting Yes.
The Completion Notification field defaults to Email alert, which means when the batch has completed, an email is sent to the email address you use to login to Morningstar Office. If you do not want to receive this email, select None from this field.
In the Report Title field, enter a name for the entire group of batch reports (optional).
The Create Batch report folder by field allows you to save the reports that are generated by the batch to a folder (on the Reports tab) with either the name of the batch schedule, the date the reports were generated, or both the date and name. This selection will make it easier to identify the reports in this batch.
How do I use the Targets tab in the Report Generation Schedule window?
After you complete the fields on the Schedule tab, do the following:
Click the Targets tab.
If you wish to aggregate a client’s accounts together, check the box for Aggregate Accounts.
If you wish to segregate a client’s accounts, check the box for Segregate Accounts.
Note: You can both aggregate and segregate accounts for batch reports. If neither box is checked, each report will run at its default level; i.e., the client level or account level.
By default, the Specify Target Pool field is set to Entire Practice (All Clients). To select specific groups, composites, clients or accounts for whom you want to run the batch reports, click the Specify Target Pool drop-down field and make a selection.
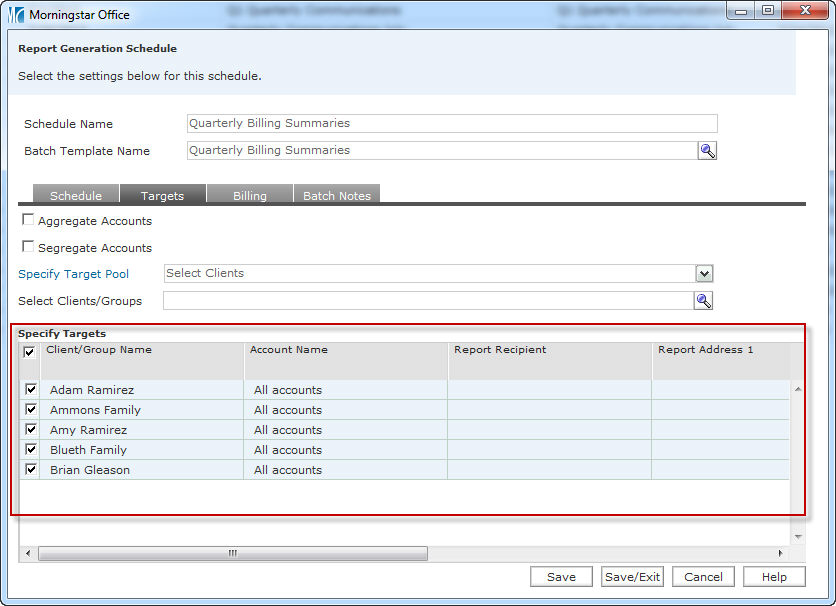
If you chose specific clients, accounts, etc. in step 4, in the Select Clients/Groups field, click the magnifying glass icon to select the clients, accounts groups or composites you want.
Click Save.
When the confirmation message appears, click OK.
How do I use the Billing tab in the Report Generation Schedule window?
The Billing tab in the Report Generation Schedule window is optional; you do not have to visit this tab unless you want to overwrite existing fee data. Remember, though, that if you overwrite existing fee data, any special items (credits, adjustments, etc.) you have created will be deleted.
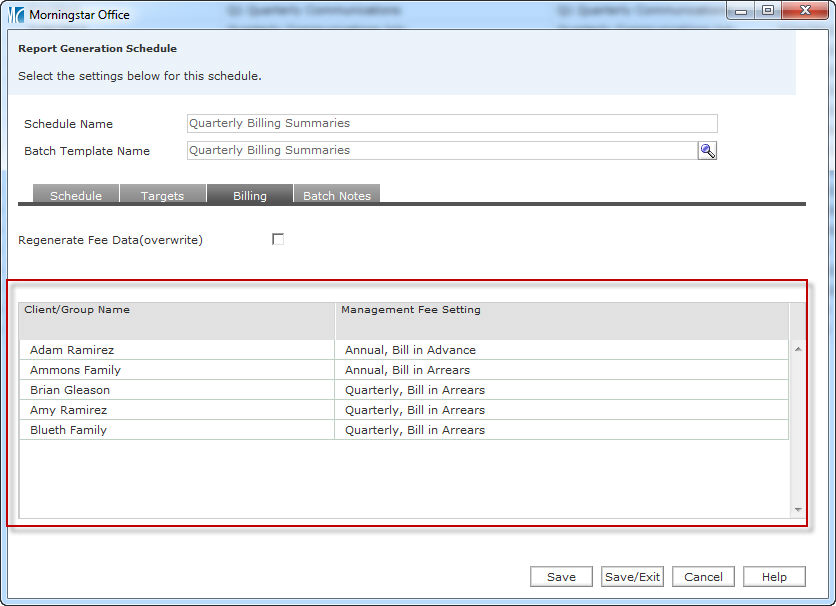
You should also review the clients included here, and confirm the Management Fee Setting is correct. If it is not, you cannot change anything from this tab. You will have to either revisit the Targets tab to change the clients who are included, or return to the Settings Assignment window (via the Tools menu at the top of the Office window) to change the Management Fee Setting.
How do I use the Batch Notes tab in the Report Generation Schedule window?
The Batch Notes tab is also optional, but you can use this to remind you of which reports are being run in a batch, who the targets are, and what the frequency is for the schedule. The note you enter here is available only in this window; it is not surfaced elsewhere in Morningstar Office.
To make an entry on the Batch Notes tab, do the following:
Click Add Rows. A new row appears.
Type a Name for the note.
In the Description field, type a note to remind yourself as to why this batch schedule was created.
Click Save. The Create Date and Last Modified Date fields automatically populate.
How do I set a batch report to run immediately?
On the Batch Schedules page, the Next Run Date column is the date that the reports will run and automatically be generated. To generate the reports immediately, do the following:
On the Reports tab, go to the Batch Schedules page.
Check the box to the left of the row number of the batch you want to run.
From the Action menu, select Run. When your batch is finished processing, you can retrieve your batch reports from the Reports page on the Reports tab.