![]()
![]()
This topic explains how to export data from Fidelity WealthCentral. After you export your data from Fidelity WealthCentral, you will be ready to import it into Morningstar Office. Once imported, you will be able to perform portfolio reporting, portfolio accounting, and billing for your clients and accounts.
If you have never imported data into Morningstar Office before, please review the Preparing to Import Data into Morningstar Office topic.
Note: Morningstar highly recommends that you begin importing with the help of a Morningstar Import Specialist. If you have never imported from this source before, call the Support team at 1-866-215-2503 for more details.
What is the process for exporting data?
Before importing data into Morningstar Office, you must export it from Fidelity WealthCentral.
You need to do the following:
Create a profile for exporting data from Fidelity WealthCentral.
Decide whether you want to export manually or set up an automatic download. Morningstar strongly recommends having an automatic download for Standard Format B set up. When transactions are manually downloaded, there is a greater risk of missing data if the entry date is later than the trade date.
How often should I export data?
It is strongly recommended that you export from your custodian on a daily basis. This ensures that daily fixed income prices (or other prices not supplied by Morningstar) are imported.
How can I save time with Morningstar’s Back Office Services team?
For advisors who wish to save the time and trouble of initialization, daily importing and reconciliation, Morningstar is pleased to offer the option of outsourcing these tasks to our Back Office Services team. Working directly with you to define and meet your needs, Morningstar’s BOS team will operate as an extension of your internal staff, under your direction and terms. If you would like to learn more about this service, please contact your Client Service Consultant.
This section describes how to export data files from Fidelity WealthCentral. The following topics are covered:
what types of files are downloaded from Fidelity WealthCentral
how to install and authenticate the Fidelity Profiler Service
how to setup an automatic download for Fidelity Wealth Central, and
How do I contact Fidelity WealthCentral?
If you are new to Fidelity, contact a Fidelity Representative at 1-800-523-5518. Fidelity can also help you set up your profiler, which is used for automatic daily downloads.
You can also reach a Fidelity rep by filling out this form: http://prcwebs.com/webpost/fidelity/WealthServices/BRC_submit2.aspx
What file types do I need from Fidelity WealthCentral?
When you download data from Fidelity WealthCentral, you will receive the file types as shown in the following table:
|
File Name mm=month, dd=day, yy=year |
File Type |
|
fimmddyy.ACC |
Account |
|
fimmddyy.NAM |
Client Name |
|
fimmddyy.POS |
Position |
|
fimmddyy.PRI |
Price |
|
fimmddyy.SEC |
Security |
|
fimmddyy.BAL |
Cash Balance |
|
fimmddyy.TRN |
Transaction |
|
fimmddyy.UGL |
Cost Basis |
All files from Fidelity can be downloaded to one main folder to import from.
How do I install and authenticate the Fidelity Profiler Service?
The WealthCentral Profiler Service must be installed in order to perform scheduled and delivered exports.
Notes on Scheduling Exports using the Profiler Service:
To ensure there is no impact during the opening and closing of the market, all exports ARE NOT available between midnight and 6am, 9am to 10am, and 3:30pm to 4pm EST.
The Profiler Service will not deliver the exports if your computer is turned off at the scheduled time.
Follow these steps to install the Profiler Service:
Log into Fidelity WealthCentral.
Go to Settings, Software Installs and click the Fidelity WealthCentral Scheduled Exports Client Install Software link.
Note: Once installed, you must authenticate your login credentials and then re-authenticate them on a regular basis. The system does not notify you automatically when the re-authentication is required, so you should make a note of when this must be done. Although the token has a 90 day expiration, Fidelity recommends that you re-authenticate your login information every 60 days.
The User ID with Authentication must be the same as the ID that created the profile.
As part of the WealthCentral Profiler Service installation, a shortcut to the service displays on your computer’s Desktop; an icon also displays in the system tray.
Note: The directions below reflect those used if you are running Microsoft® Windows® 7. Your directions may differ if you use another operating system.
Start the WealthCentral Profiler Service by doing one of the following:
From the Windows Start button, select All Programs, Fidelity Investments, WealthCentral Profiler Service, Launch WealthCentral Profiler Application.
Right-click the WealthCentral Profiler Service icon in the system tray and select Launch WealthCentral Profiler Application from the shortcut menu that displays.
Double-click the Launch WealthCentral Profiler Application shortcut on your computer’s desktop.
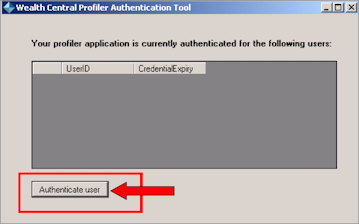
Click the Authenticate User button on the WealthCentral Profiler Authentication Tool screen that displays.
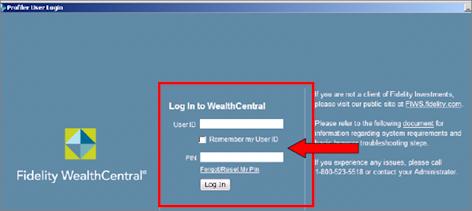
The Profiler User Login screen displays; enter your User ID and PIN (Password) and then click the Log In button.
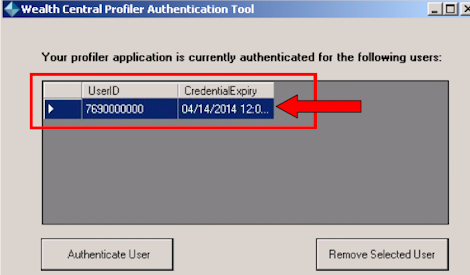
The authenticated User ID and its certification expiration date and time display. The Profiler log files are turned on automatically when you install the Profiler.
How do I setup an automatic download for Fidelity Wealth Central?
You must install the Fidelity Profiler Service on your computer if you want to use the scheduled and delivered export, which downloads the files straight to your computer each day. That process is explained below. Note: You can still set up a scheduled download without the Profiler Service; the files will just be generated on the website each day for easy download.
Log in to Fidelity Wealth Central using the User ID and PIN provided by Fidelity.
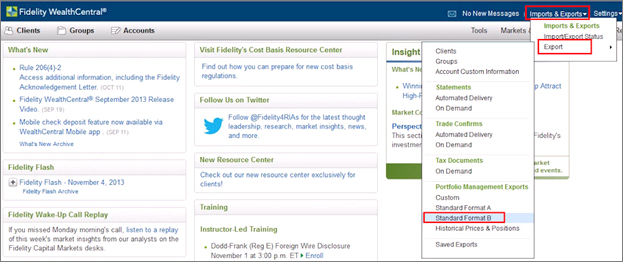
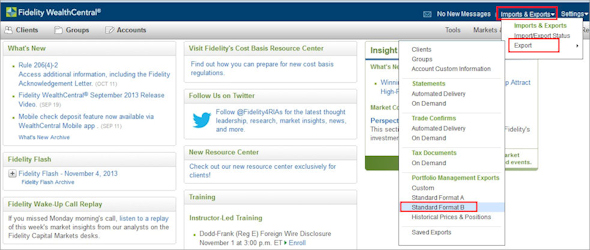
At the top of the Fidelity WealthCentral page, click on the Imports & Exports menu.
Hover over Export to view the sub-menu.
From the Export sub-menu, select Standard Format B. The Export Standard Form B wizard opens.
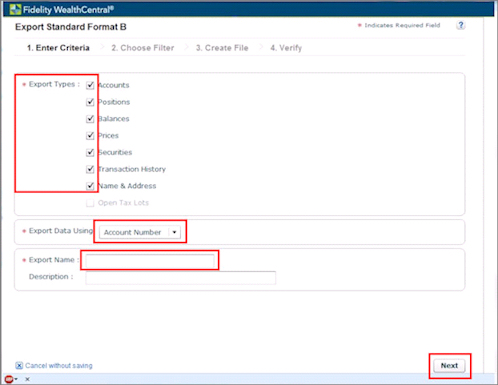
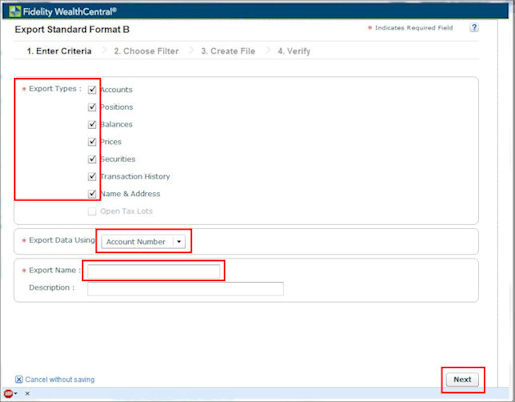
From the Enter Criteria step, ensure that all Export Types are checked.
In the Export Data Using drop-down field, Account Number appears as default. This is the correct setting.
Enter an Export Name that will identify the daily download (i.e. MS Daily Download).
Click Next to move to the Choose Filter step. Note: Depending on the browser you choose, the Next button may not be visible. If the Next button is not visible, click <ENTER> on your keyboard.
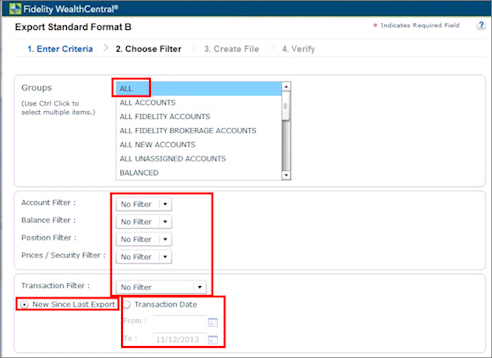
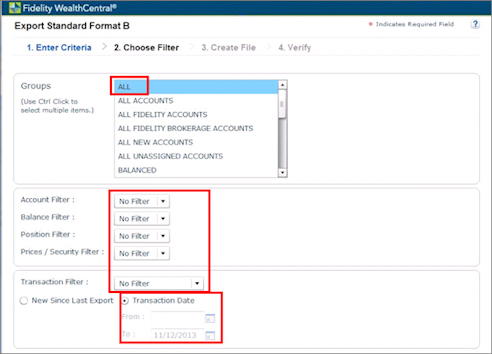
From the top section of the Choose Filter step, select your Group. This defaults to ALL; however, if you set up a Group within WealthCentral it will also appear. Note: Contact Fidelity WealthCentral to learn how to create a group.
From the middle section of the Choose Filter step, select your filters. For each field, the default is No Filter. This is the correct setting.
From the bottom section of the Choose Filter step, select New Since Last Import.
Click Next to move to the Create File step.
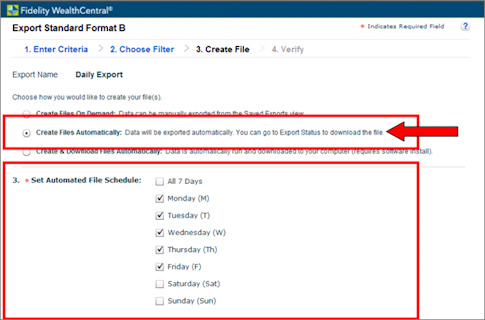
From the Create File step, you have 2 choices.
To schedule daily exports that will only be generated on Fidelity’s website, select Create Files Automatically. Set your Automated File Schedule for Monday, Tuesday, Wednesday, Thursday, and Friday so that the files will be created for those days.
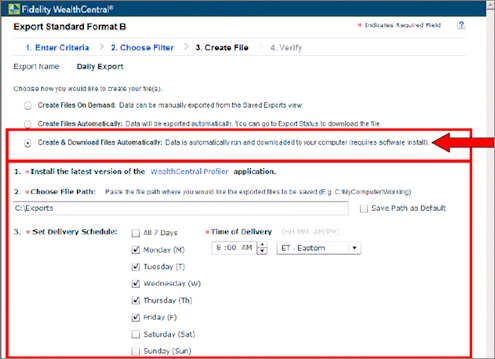
To schedule daily exports that will generate the files daily and download them to your computer, select Create & Download Files Automatically.
The Profiler Service must be installed,
Set the File Path for exports to download to, and
Set the time of day that you want the exports to download.
Click Next to move to the Verify step.
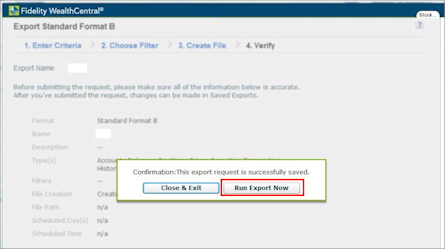
From the Verify step, review all fields for accuracy. This is a recap of the previous three steps in the wizard.
Click Submit. A confirmation message opens.
Close and Exit the export window.
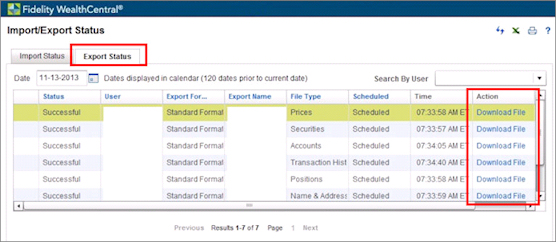
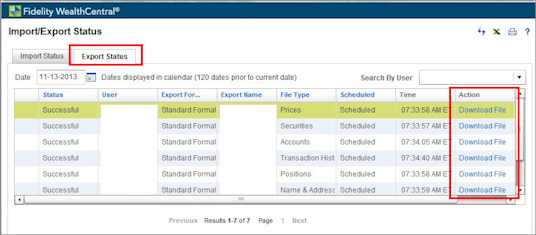
From the WealthCentral page, select Imports & Exports...Import/Export Status. The Import/Export Status window opens.
Be sure you are on the Export Status tab.
If you only scheduled the exports, you can click the Download File link for each row that appears; however, if you used the schedule and deliver method, the download should be ready in your designated folder on each scheduled day. Note: The first automatic file that is generated will contain 120 days’ worth of transaction history.
How do I manually export data from Fidelity WealthCentral?
To manually export data from Fidelity WealthCentral, do the following:
Log in to Fidelity WealthCentral using the User ID and PIN provided by Fidelity.
At the top of the Fidelity WealthCentral page, click on the Imports & Exports menu.
Hover over Export to view the sub-menu.
From the Export sub-menu, select Standard Format B. The Export Standard Form B wizard opens.
From the Enter Criteria step, ensure that all Export Types are checked.
In the Export Data Using drop-down field, Account Number appears as default. This is the correct setting.
Enter an Export Name of your choosing.
Click Next to move to the Choose Filter step. Note: Depending on the browser you choose, the Next button may not be visible. If the Next button is not visible, click <ENTER> on your keyboard.
From the top section of the Choose Filter step, select your Group. This defaults to ALL; however, if you set up a Group within WealthCentral it will also appear. Note: Contact Fidelity WealthCentral to learn how to create a group.
From the middle section of the Choose Filter step, select your filters. For each field, the default is No Filter. This is the correct setting.
From the bottom section of the Choose Filter step, select Transaction Date. From there, enter your start date in the From field and your end date in the To field.
Click Next to move to the Create File step.
From the Create File step, select Create Files on Demand. Note: Morningstar recommends that if you choose to do a manual export, you should download the files everyday since historical balance files are not available and positions and price files are only as of the most recent business day.

Click Next to move to the Verify step.
From the Verify step, review all fields for accuracy. This is a recap of the previous three steps in the wizard.
Click Submit. A confirmation message opens.
To view the files immediately, click Run Export Now on the confirmation message. This brings you back to the WealthCentral page. Note: To view your files at a later time, you can click Close and Exit, but you will need to return to step 19 to complete the export process.
From the WealthCentral page, select Imports & Exports...Import/Export Status. The Import/Export Status window opens.
Be sure you are on the Export Status tab.
Under the Action column, click the Download File link for each row that appears.
After you successfully download the files, navigate to the folder where your Fidelity WealthCentral files are stored and verify that the correct files were downloaded based on the table.
Now that you have exported your data from Fidelity WealthCentral, you are ready to import it into Morningstar Office.
 See Also
Handling Warnings in the Import Blotter
Troubleshooting Guide for Common Import and Reconciliation Issues