![]()
![]()

This topic explains how to import data from DST FAN Mail. After you export your data from DST FAN Mail, you will be ready to import it into Morningstar Office. Once imported, you will be able to perform portfolio reporting, portfolio accounting, and billing for your clients and accounts.
If you have never imported data into Morningstar Office before, please review the Preparing to Import Data into Morningstar Office topic.
Note: Morningstar highly recommends that you begin importing with the help of a Morningstar Import Specialist. If you have never imported from this source before, call the Support team at 1-866-215-2503 for more details.
For advisors who wish to save the time and trouble of initialization, daily importing and reconciliation, Morningstar is pleased to offer the option of outsourcing these tasks to our Back Office Services team. Working directly with you to define and meet your needs, Morningstar’s BOS team will operate as an extension of your internal staff, under your direction and terms. If you would like to learn more about this service, please contact your Client Service Consultant.
Before importing data into Morningstar Office, you must export it from DST FAN Mail. There are two ways to export the data from DST FAN Mail:
Use the Automatic Download function from the DST FAN Mail interface (recommended), or
Manually download the files from the DST FAN Mail website.
It is strongly recommended that you export from your custodian on a daily basis. This ensures that daily fixed income prices (or other prices not supplied by Morningstar) are imported.
DST File Types and Descriptions
|
File Type |
Description |
|
01 |
Distribution Activity - The Distribution Activity file is used to confirm all activity resulting from the distribution of a dividend, and long- or short-term capital gain. |
|
02 |
Direct Financial Activity - The Direct Financial Activity file is used to report all activity involving the movement of money and/or shares/units. |
|
03* |
Account Position - The Account Position file reports the current share/unit balance of every account. |
|
07 |
Non-Financial Activity - The Non-Financial Activity file is generated from maintenance activity to the shareholder/policy owner registration, and contains complete registration and non-financial information. |
|
08 |
New Account Activity - The New Account Activity file provides registration information on new accounts as they are established. |
|
09* |
Account Master Position - The Account Master Position file contains complete registration and non-financial information. |
|
17* |
Fund Price - The Fund Price file indicates the share/unit value and offering price as reported by the data providers. |
|
*File types Required for Initialization |
|
Note: *These files are REQUIRED to initialize your DST accounts; therefore, you must initialize DST accounts as of a month-end date. Securities information, such as security names, should also be included in these files. You may need to request a refresh of these files from DST if security information is incomplete.
DST files are downloaded as .zip files and automatically unzipped by the program into .txt files.
DST ZIP File Layout
Example: DTCCR01.A0048.ZIP
Characters 1-5 are the Fund Code (DTCCR is American Funds)
Characters 6-7 are the file type as mentioned above (01 is Distribution file)
Character 8 is the production code. (R means the file has been refreshed, probably a duplicate of another file)
Characters 9-12 are a unique number for user directory
DST Extracted File Layout
Example: DTCCR01.A0048_YYYYMMDD.txt
See above for characters 1-12
Characters 13-20 (after the underscore) are the 4-digit year, 2-digit month, and 2-digit day
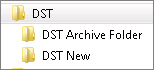
The DST interface requires a two folder setup underneath one parent folder. Typically, there is a parent folder called DST and then two subfolders underneath called DST New and DST Archive Folder.
The organization of your folder structure should be completed in the following order:
Open Windows Explorer.
Choose a location and create a folder called DST.
Create two subfolders, one called DST New and one called DST Archive Folder.
All files will be downloaded to the DST New folder. After posting the import, the files with automatically move to the DST Archive Folder.
Notes:
The DST Archive Folder has to be created exactly as it shows here. Otherwise the system will create its own DST Archive Folder.
Files posted during initialization do not move automatically to the DST Archive Folder so these will need to be moved manually.
If a file somehow gets copied and shows in both the DST New folder and the DST Archive Folder, the file will not automatically move to the DST Archive Folder. It will stay in the DST New folder until you manually move it to the DST Archive Folder. Leaving old files in the DST New folder can potentially cause reconciliation issues.
Unlike other custodian interfaces, the DST interface will read any file within the active source directory (DST New) regardless of date.
DST files can be manually exported (downloaded) from the DST FAN Mail site (call DST for instructions to do so), or they can be automatically downloaded using the DST interface within Morningstar Office.
From the main menu in Office, click Import.
Place a check next to the DST FAN Mail interface to select it and then from the menu above the interface grid, select Import.
At the end of the Active Source Directory field, click the magnifying glass icon to browse to the folder that will house the import files. Select the DST New folder and click OK.
To retrieve files from DST automatically (recommended), click the Download button to launch the download window. Enter your DST FAN Mail download credentials and target directory for the downloaded data. When files are downloaded through this process, they are automatically renamed and prepared for import.
If the files have been manually downloaded from the FAN Mail Web site, they are saved as ZIP files and cannot be imported in this form. Use the Re-name button to open the Re-name window where you set the Source and Target directories to be used during the renaming process. The files are converted to TXT files where the file name contains the fund company code, file type code, and as of date for the data contained within.
Since you cannot export your client's entire transaction history which can span several years, you need a starting point. When you initialize, we look at the earliest available position file, find out the balances in all the holdings and enter a Deliver-in transaction of that balance on the date of the position file. Note: Since DST only sends full position files at month-end, the initialization date has to be as of a month-end.
We highly recommend initializing your DST files with the assistance of your Morningstar Import Specialist. The process of initializing separate fund companies can be difficult, so we recommend having our Import Specialist walk you through setting everything up correctly. You can contact an Import Specialist at 866 215-2503.
For initialization, you will need to request the Account Master Position file (09 File) for each fund company. The Account Master Position file contains complete client registration information.
Preparing Files to be Initialized
Open Morningstar Office. On the top menu bar, click Import. The Import area opens in a separate window.
If the DST FAN Mail interface does not appear as an active import source, refer to the Edit Import Interfaces topic for instructions on adding the interface to the selection area.
In the Interface Name column, double-click DST FAN Mail or put a checkmark next to DST FAN Mail and click Import at the top of the screen. The DST FAN Mail dialog box opens.
In the Active Source Directory box, click the magnifying glass icon to browse to the folder that contains the downloaded files (DST New) and click OK.
The types of custodian files available are listed under the File Type column. When a file type is found within the DST New folder, it is automatically selected for import. Uncheck the box to exclude the file from import. The Last Custodian File Date identifies the date of the last imported file date for the specified file type.
Click the View File Table button located at the bottom of the screen to review the data files. Based on the path set in the Active Source Directory, each fund company and the data available (files and as of dates) is listed in the grid.

Take Note of each fund company code, the associated Account Master file date, and any month-end Account Position dates. The oldest month-end Account Position date for each company will be that company’s initialization date.
Navigate to your DST folder and create temporary subfolders under the DST parent folder.
Create a folder for each initialization date that you took note of from the View File Table grid. Some fund companies may have similar dates. You only need one folder for each date, not each company.
Create a folder for each month starting from the month after the oldest initialization date to the current month. See example below, based on the View File Table image above.

Open the DST New folder and locate the fund company(s) that has the oldest initialization date. Select all files that have the same initialization date. Move these files into the correct temporary subfolder. Make sure to cut and paste; not copy.
From the DST New folder, locate the same fund company(s) selected in the previous step that also has Account Master files. Refer to DST File Types if unsure. Cut and paste these files into the same temporary initialization date subfolder. Note: The Account Master file date may be different than the Account Position file date. This is ok.
Continue moving files based on initialization date and master account until all fund companies are separated into their correct initialization subfolders.
In the DST New folder, divide any remaining files by month. Move all files for each month into their corresponding month subfolder.
The DST New folder should be empty after these steps are completed.
Go into the oldest initialization date subfolder. Cut all the files and paste them back into the DST New folder. These fund companies are ready to initialize. Note: The temporary folder can be deleted when all files have been removed.
Initializing Files
Open Morningstar Office. On the top menu bar, click Import. The Import area opens in a separate window.
If the DST FAN Mail interface does not appear as an active import source, refer to the Edit Import Interfaces topic for instructions on adding the interface to the selection area.
In the Interface Name column, check the box to the left of DST FAN Mail. On the Action Shortcuts tool bar, click Initialize Positions. The DST FAN Mail dialog box opens.
In the File Name box, click the magnifying glass icon to browse and locate your DST New folder.
Make sure the Initialize Date reflects the correct month-end date that you are trying to initialize.
Click Initialize. The Import Blotter opens.
If you encounter any warnings, you can find additional information on them by holding down the CTRL key and double-clicking the warning icon. You can also refer to the Handling Warnings in the Import Blotter topic or contact Morningstar Office Support at 866 215-2503 for assistance.
For variable annuity securities coming in from DST, review the Variable Annuity Subaccount Logic topic.
Click Post.
Go back to your DST New folder and move the files to the DST Archive Folder. As noted before, these files only need moved manually during the initialization process.
Continue these steps for any other initialization folders that you have created.
Do the normal import process for each month until the data is current.
If you have subfolders created in the main DST folder with monthly files, you will want to import one month at a time.
Move the contents of the earliest month subfolder to the DST New folder and follow the normal import process to import the data. Repeat the process until all monthly file folders have been imported. Once the data within each month file has been moved to the DST New folder, the temporary folder can be deleted.
If there are no subfolders, all new files would just be located within the DST New folder using whichever download method you choose.
Continue daily with the normal import process.
Open Morningstar Office. On the top menu bar, click Import. The Import area opens in a separate window.
In the Interface Name column, dboule-click DST FAN Mail or put a checkmark next to DST FAN Mail and click Import at the top of the screen. The DST FAN Mail dialog box opens.
In the Active Source Directory box, click the magnifying glass icon to locate and select the DST New folder on your computer.
Check the box for Do Not Archive Position Files if you wish to have position files remain in the DST New folder for reconciliation.
The types of custodian files available are listed under the File Type column. When a file type is found within the DST New folder, it is automatically selected for import. Uncheck the box to exclude the file from import. The Last Custodian File Date identifies the date of the last imported file date for the specified file type.
Click Import at the bottom of the screen.
When the Import Blotter opens, examine the Accounts, Transactions, and Securities pages to make sure that your data is correct.
If you encounter any warnings, you can find additional information on them by holding down the CTRL key and double-clicking the warning icon. You can also refer to the Handling Warnings in the Import Blotter topic or contact Morningstar Office Support at 866 215-2503 for assistance.
For variable annuity securities coming in from DST, review the Variable Annuity Subaccount Logic topic.
Click on Reconcile.
In the dialog box that opens, you’ll see a table in which all of the fund companies are listed for which you have Position (03) Files available.
Position files are required for the reconciliation process. During reconciliation, Morningstar checks to make sure that the positions held in each of your clients’ accounts match the positions stated by DST in their files.
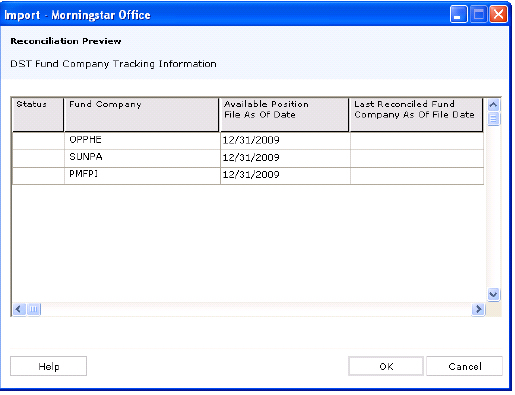
Click OK. Even if you have no position files available (position files only come down at the end of the month or when a new account is added), it is good to get into the habit of running reconciliation each day.
Handle any un-reconciled items. Review the Troubleshooting Guide for common import and reconciliation issues, or the Distribution Utility topic for help with reconciling fixed annuities.
Notes:
We highly recommend getting DST Vision to help reconcile data. DST Vision can show more transactions than individual annuity companies, making it easier to research out of balance issues.
DST does not use cash flows so everything should be out of pocket. If a cash position shows, you should delete all transactions under it. The out of pocket transactions will show as external cash flows and result in additions and withdrawals on performance reports.
After you get the notice that all positions reconciled successfully, you are ready to post the data (if you have imported data that requires posting).
Note: If no position file is available to use for reconciliation, you will see the message, “You have not run the reconciliation process.” If this is the case, don’t worry! You can still post your data. Your accounts will only be reconciled on days when a position file is available.
Click Post.
Important Note: If you start receiving data from a new fund company, the company should be separated from all other files until the master file is obtained, then it can be initialized by itself using the initialization process. It should then be imported to the current date of the other fund companies. Then it can be imported regularly with all other fund companies.
Handling Warnings in the Import Blotter
Troubleshooting Guide for Common Import and Reconciliation Issues
 See Also